To sew linen fabric, prewash it if the finished item will be laundered, press the yardage flat, cut on grain, test the needle and stitch settings on scraps, sew without stretching the fabric, finish the raw seams, and press each seam as you work. Linen fabric behaves differently by weight, weave stability, blend, finish, and intended use, so we recommend testing your setup on the same linen before cutting or sewing the final project.
Linen is a natural fiber made from flax, and textile references describe linen as ranging from lightweight to heavyweight with apparel uses such as dresses, jackets, pants, blouses, and shirts. For sewing, the practical issue is not only that linen is a natural fabric; the practical issue is that linen’s weight, weave, shrinkage behavior, raw-edge fraying, and seam bulk determine how you prepare, cut, stitch, and finish the fabric.
Use this setup box before you cut linen fabric. The values below are starting points only; confirm the final needle, thread, stitch length, tension, and seam finish on scraps from the same linen.
| Decision | Starting rule | Validation before sewing |
|---|---|---|
| Prewash | Prewash washable linen before cutting if the finished item will be laundered | Match the wash and dry method to the finished item’s care plan |
| Cutting | Press flat, square the grain, and cut without stretching the linen | Check that the selvage and crossgrain are aligned before placing pattern pieces |
| Needle | Match the needle to linen weight and seam thickness | Sew a test seam through the same number of layers used in the project |
| Stitch length | Start with a medium stitch length and adjust after testing | Look for puckering, crowded stitches, skipped stitches, or weak seams |
| Seam finish | Choose a finish that controls raw-edge fraying without adding too much bulk | Test the seam finish, press it, and inspect the edge before sewing the project |
| Pressing | Press each seam during construction | Test heat and steam on a scrap if the linen is dark, dyed, printed, blended, or finished |
Linen sewing setup depends on fabric weight, weave stability, project type, and the number of seam layers under the presser foot. Use this table as a decision framework, not as a universal rule, because two linens with the same fiber content can sew differently if one is loosely woven, heavily finished, blended, coated, or layered.
| Linen type | Common project fit | Needle starting point | Stitch length starting point | Seam finish to test first | Watch for |
|---|---|---|---|---|---|
| Lightweight linen | Blouses, soft tops, lightweight linings, delicate layers | Fine woven-fabric needle; validate size on scraps | Medium test stitch; adjust if the seam puckers | French seam, narrow hem, or fine zigzag | Shifting, distortion, visible puckering, fraying |
| Medium-weight linen | Shirts, dresses, pants, aprons, casual home décor | Medium woven-fabric needle; validate through project layers | Medium test stitch; adjust after pressing | Zigzag, serged edge, French seam, or flat-felled seam | Wrinkling, seam fray, grainline distortion |
| Heavy linen or linen canvas | Structured bags, art canvas, table goods, utility décor | Stronger woven-fabric needle; validate through layered seams | Longer test stitch if the seam looks crowded | Bound seam, serged edge, or flat-felled seam if bulk allows | Bulk, skipped stitches, needle deflection, bulky seam allowances |
To sew linen fabric cleanly, complete the preparation steps before final stitching instead of trying to correct distortion after the fabric is cut. Linen can produce crisp, durable seams, but it is less forgiving when yardage is washed late, pulled during cutting, sewn off grain, or left with unfinished raw edges.
Washable linen fabric should be prewashed before cutting when the finished project will be washed. Fabric-care guidance from linen suppliers commonly recommends prewashing cotton and linen with the same wash method planned for the finished item, so fabric change happens before construction rather than after the item is sewn.
Do not treat prewashing as a one-method rule. A linen napkin that will be machine washed and dried has a different care expectation than a lined garment, a dry-clean-only design, a coated fabric, or an art canvas. Match the prewash method to the actual care plan, and do not claim a shrinkage percentage unless you have measured that specific linen.
| Step | What to do | Why it matters |
|---|---|---|
| Check the fabric label or supplier care note | Confirm whether the linen is washable, dry-clean-only, blended, finished, or coated | The care method determines whether prewashing is appropriate |
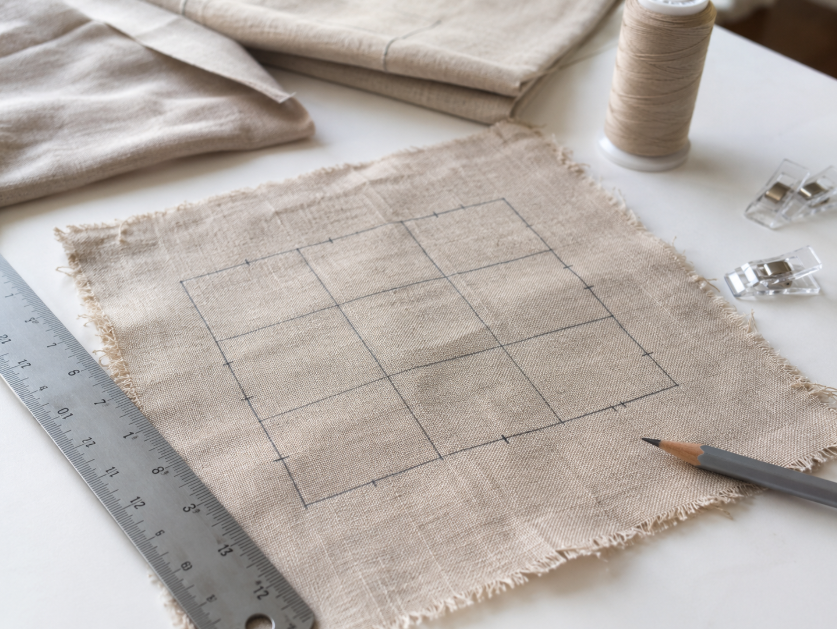
| Measure a test swatch | Mark and measure a square swatch before washing | The swatch gives project-specific evidence instead of a generic shrinkage estimate |
| Secure raw test edges | Zigzag, serge, or stitch around a test swatch before washing | Linen edges may fray during laundering |
| Wash the swatch or yardage | Use the same wash method planned for the finished item | The test reflects real project care |
| Measure after drying | Record length and width after the fabric dries | The before-and-after measurement helps adjust cutting and yardage decisions |
| Press before cutting | Press the linen flat after drying | Flat linen cuts more accurately than folded or wrinkled linen |
Cut linen fabric on grain because grainline distortion can twist a garment, skew a curtain panel, or make seams look uneven. Before cutting, align the selvages, smooth the linen without stretching it, and check that the crossgrain sits square to the selvage.
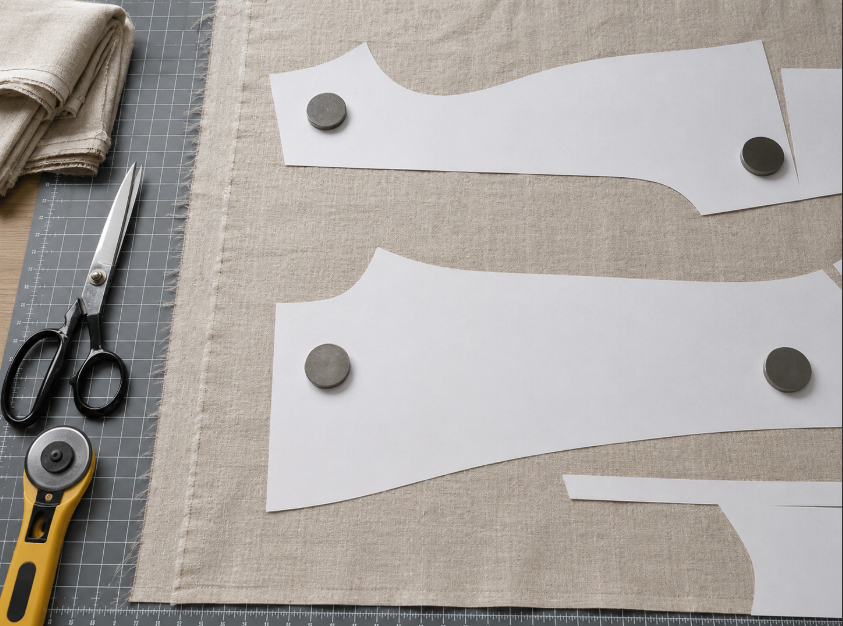
Use sharp scissors or a rotary cutter with a stable cutting surface. Pin inside the seam allowance or use pattern weights when pin marks would show. If the linen is very light or loosely woven, move cut pieces as little as possible before stitching because overhandling can stretch edges and curves.
Choose the needle, thread, and stitch length for linen by fabric weight, weave stability, and seam thickness, then confirm the setup on scraps before sewing the project. A clean test seam should feed evenly, lie flat after pressing, and avoid skipped stitches, thread breakage, puckering, or visible needle damage.
| Setup choice | Use this decision rule | What to test on scraps |
|---|---|---|
| Needle size | Use a finer needle for lightweight linen and a stronger needle for heavier linen or multiple layers | Skipped stitches, visible needle holes, thread shredding, needle deflection |
| Needle type | Start with a sharp or universal needle suitable for woven fabric | Whether the needle pierces cleanly without pushing threads |
| Thread | Use a thread weight compatible with the linen weight and seam purpose | Seam strength, bulk, color visibility, and thread tension |
| Stitch length | Start with a medium stitch length and adjust after the test seam | Puckering, crowded stitches, weak seams, uneven feeding |
| Tension | Adjust tension only after the needle, thread, and stitch length are plausible | Balanced stitches on both sides of the linen |
A longer stitch may look cleaner on some medium or heavy linens because crowded stitches can make a seam look tight or puckered. A shorter stitch may work for detail areas or lightweight fabric if the test seam lies flat. We recommend changing one variable at a time, pressing the test seam, and comparing the result before changing tension.

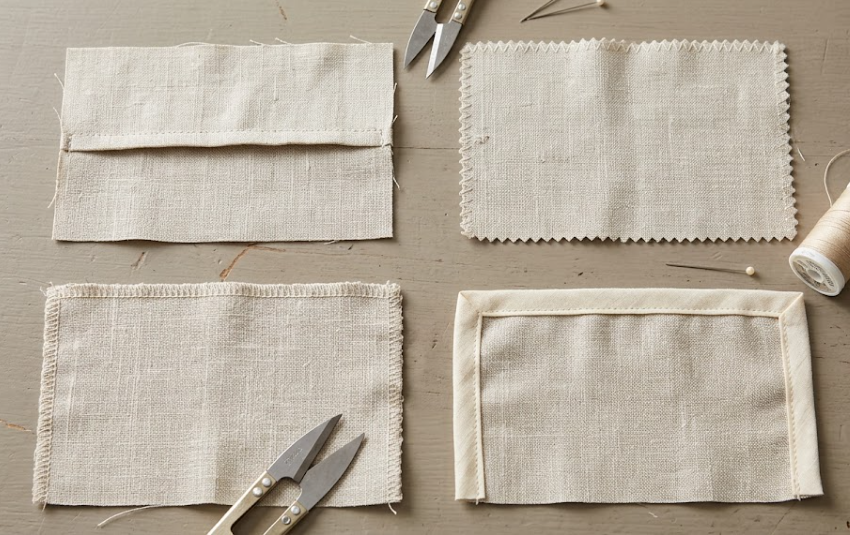
Linen seams need a suitable finish because raw woven edges can fray during wear, washing, or handling. The seam finish should match the linen weight, the project type, and the amount of seam bulk the finished item can tolerate.
| Seam finish | Best use case | Strength | Bulk level | Avoid when |
|---|---|---|---|---|
| French seam | Lightweight linen, unlined garments, clean interior seams | Encloses raw edges neatly | Low to medium | Heavy linen creates too much enclosed bulk |
| Zigzag finish | Basic machine finish for many linen weights | Reduces edge unraveling | Low | Very loose weaves may still shed at the edge |
| Serged edge | Fast, clean finish when a serger is available | Strong edge control | Low to medium | Decorative exposed seams require a different look |
| Flat-felled seam | Shirts, utility garments, durable visible seams | Strong and tidy | Medium | Thick linen layers create excessive bulk |
| Bound seam | Heavy linen, linen canvas, unlined décor, structured items | Encloses bulky raw edges | Medium to high | Lightweight linen where binding overwhelms the seam |
Finish a sample seam before choosing the final construction method. The correct seam finish is the one that controls fraying, lies flat after pressing, and does not add more bulk than the linen or project can handle.
Press linen during construction because pressed seams control shape before the next seam is sewn. Pressing only at the end cannot fully correct seams that were stitched, crossed, or topstitched while still folded or rippled.
Press each seam flat first, then press it open or to one side according to the construction method. Use a press cloth when the linen surface, color, print, or finish could mark under heat. Test heat and steam on a scrap before pressing visible project fabric, especially when the linen is blended, dyed, printed, finished, or dark colored.
Most linen sewing problems come from preparation, handling, machine setup, seam finish, or pressing choices. Diagnose the visible symptom first, then test one likely cause at a time instead of changing the needle, thread, tension, and stitch length all at once.
| Problem | Likely cause | Fix | Prevent next time |
|---|---|---|---|
| Seam puckers | Stitch length too short, tension mismatch, dull needle, or fabric pulled while sewing | Test a fresh needle, adjust stitch length, and sew without pulling | Test on scraps before sewing the project |
| Raw edge frays badly | Seam allowance left unfinished or fabric washed with unsecured raw edges | Use a French seam, zigzag, serged edge, bound seam, or flat-felled seam | Finish raw edges before laundering or construction stress |
| Cut piece looks twisted | Fabric cut off grain or stretched during layout | Recheck grainline and recut if the pattern allows | Square the fabric before cutting |
| Skipped stitches | Needle too fine, dull needle, heavy seam layers, or thread mismatch | Change the needle and test through the same number of layers | Test on layered scraps, not a single flat scrap |
| Seam feels bulky | Seam finish too heavy for the linen weight | Trim, grade, press, or select a lower-bulk finish | Match seam finish to fabric weight |
| Hem ripples | Curved edge stretched or hem depth too wide for the fabric | Press, ease, stabilize, or narrow the hem | Test hem depth on a scrap first |
Choose linen fabric by matching the project’s structure, care method, opacity need, and seam stress to the linen’s weight and weave. A soft blouse linen, a washable table linen, and a heavy linen canvas can all be linen, but each one asks for a different sewing setup.
| Project type | Linen traits to prioritize | Sewing note |
|---|---|---|
| Shirts and blouses | Lightweight or medium-weight linen with enough stability to cut cleanly | Test seams for puckering and choose low-bulk finishes |
| Dresses and pants | Medium-weight linen with enough opacity and body for the pattern | Prewash if washable and press seams during construction |
| Napkins and table linens | Washable linen with stable weave and clean edge behavior | Test hems and mitered corners before cutting all pieces |
| Curtains and panels | Width, drape, opacity, and shrinkage behavior | Measure after prewashing or plan yardage around the care method |
| Structured bags or utility décor | Heavy linen or linen canvas with enough body for the project | Test needle strength, seam bulk, and edge finish through multiple layers |
| Art canvas or stretching projects | Linen canvas with suitable weight and surface characteristics | Do not treat art canvas as interchangeable with apparel linen |
For yardage planning, use the fabric yardage calculator after confirming the project size, fabric width, and prewash plan. For heavy, structured, or art-related applications, review linen canvas fabric separately rather than treating it as ordinary apparel linen. For terminology such as grainline, selvage, seam allowance, and bias, use the sewing glossary as a supporting reference.
Linen fabric and linen canvas differ mainly by structure, weight, surface stability, and intended use. Many apparel linens are selected for drape, breathability, and garment comfort, while linen canvas is generally chosen when the project needs more body, structure, or a stable surface.
Do not substitute linen canvas for a soft garment pattern unless the pattern is designed for a structured fabric. Do not substitute lightweight apparel linen for a canvas, upholstery, or stretching project unless the project can tolerate less body and less surface stability. For a deeper comparison, use a dedicated linen canvas or cotton-and-linen-canvas resource instead of expanding this how-to guide into a canvas comparison article.
This guide uses external textile and care references for the broad claims that linen is made from flax and that washable linen should be prewashed before sewing when the finished item will be laundered. The machine setup, seam finish, pressing, and troubleshooting recommendations should be treated as starting-point guidance until they are confirmed through SME review or first-party testing.
A publishable test protocol should record the linen type, supplier description, fabric weight if available, wash method, needle, thread, stitch length, tension setting, seam finish, number of layers, pressing method, and photo evidence before and after pressing. We recommend testing at least one lightweight linen, one medium-weight linen, and one heavy linen or linen canvas sample before publishing project-specific settings.
Prewash linen before sewing when the finished item will be laundered and the fabric care instructions allow washing. Use the same wash and dry method planned for the finished item so any fabric change happens before cutting rather than after construction.
Use a needle that matches the linen weight and the number of seam layers. Lightweight linen usually needs a finer needle than heavy linen or linen canvas, but the final needle should be confirmed on scraps from the project fabric.
A medium stitch length is a practical starting point for many linen projects, but stitch length should be adjusted after testing the seam on scraps. If the seam puckers, looks crowded, or does not lie flat after pressing, change one variable at a time and retest.
Stop linen from fraying by finishing the raw edges with a seam finish that suits the fabric weight. Lightweight linen may work with French seams or narrow finishes, while medium and heavy linens may need zigzag, serged, flat-felled, or bound seam finishes.
You can sew linen without a serger if you use another seam finish that controls the raw edge. Zigzag stitching, French seams, flat-felled seams, and bound seams can all work when they match the linen weight and project type.
Linen is manageable to sew when it is prewashed, cut on grain, handled without stretching, tested on scraps, and finished at the seams. Very lightweight, loosely woven, or heavy canvas-like linen can be more demanding than stable medium-weight linen.
Linen canvas is a type of linen fabric, but it is usually heavier and more structured than many apparel linens. Use linen canvas for projects that need body or surface stability, and use apparel linen when the project needs drape and garment comfort.
The amount of linen fabric depends on the project dimensions, fabric width, pattern layout, repeat or nap considerations, and prewash plan. Use the fabric yardage calculator as a planning tool after confirming the project measurements and fabric width.
Sewing linen fabric successfully depends on preparation, testing, and seam control. Prewash washable linen before cutting, press the yardage flat, cut on grain, test machine settings on scraps, finish raw edges, and press seams during construction.
Use linen weight and project type to choose the setup. Lightweight linen usually needs lower-bulk seam finishes, medium-weight linen works for many garments and home projects, and heavy linen or linen canvas needs extra testing for needle strength, seam bulk, and edge finishing.